孤舟蓑笠翁,独钓寒江雪

Android 图形系统 -- TextureView 使用

概述

TextureView 是 Android 4 引入的组件,继承自 View,用来承载数据流的显示,它将 SurfaceTexture 和 View 结合到了一起。与 SurfaceView 相比,它并没有创建一个单独的 Surface 来绘制,解决了 SurfaceView 无法做一些动画的问题。
TextureView 必须在硬件加速开启的窗口中。在 Androidmanifest 加 android:hardwareAccelerated=”true”,否则会无法正常绘制,并出现下面的错误:

1
TextureView: A TextureView or a subclass can only be used with hardware acceleration enabled.

关于和 SurfaceView 的更详细的对比,请参考 Android 图形系统 – SurfaceView 使用 中的相关内容。

SurfaceTexture

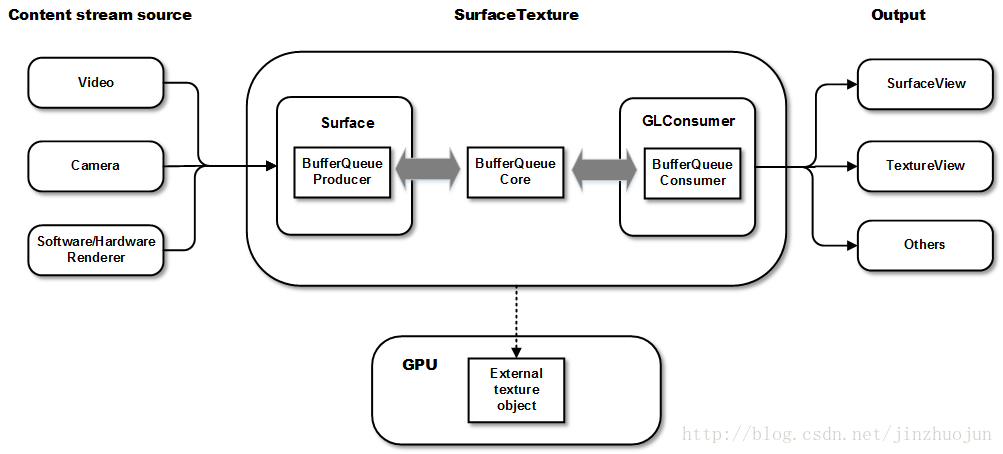
SurfaceTexture 是 Surface 和 OpenGL ES 纹理相结合的产物,它作为 TextureView 的成员变量,是用于渲染内容的,它能捕获一个图像流的一帧来作为 OpenGL 的 texture 也就是纹理。这个图像流主要是来自相机的预览或视频的解码。
和 SurfaceView 不同,SurfaceTexture 对图像流的处理并不直接显示,而是转为GL外部纹理,因此可用于图像流数据的二次处理(如Camera滤镜,桌面特效等)。比如 Camera 的预览数据,变成纹理后可以交给 GLSurfaceView 直接显示,也可以通过 SurfaceTexture 交给 TextureView 作为 View heirachy 中的一个硬件加速层来显示。
首先,SurfaceTexture 从图像流(来自Camera预览,视频解码,GL绘制场景等)中获得帧数据,当调用 updateTexImage() 时,根据内容流中最近的图像更新 SurfaceTexture 对应的GL纹理对象,接下来,就可以像操作普通GL纹理一样操作它了。
以SurfaceTexture为中心的一个pipeline大体是这样的:

使用

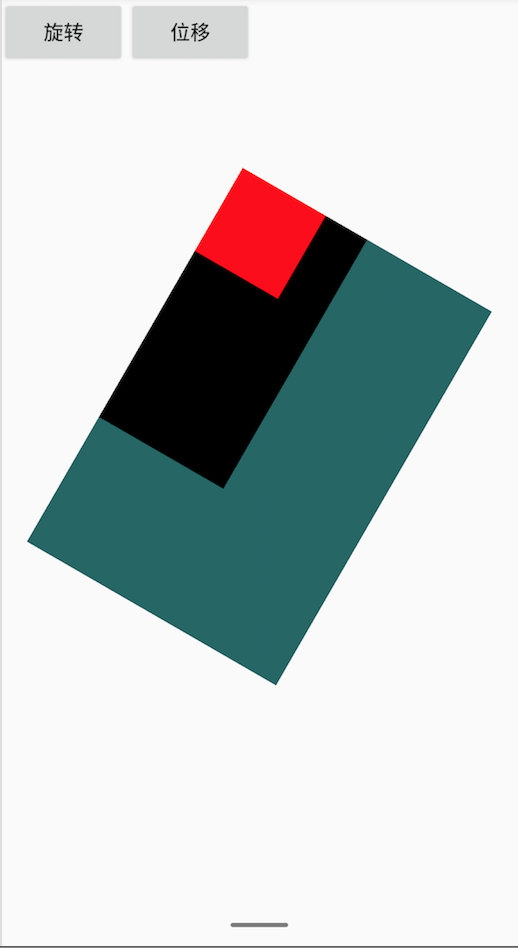
先来看一个例子,进行一些简单图像的绘制。

1
2
3
4
5
6
7
8
9
10
11
12
13
14
15
16
17
18
19
20
21
22
23
24
25
26
27
28
29
30
31
32
33
34
35
36
37
38
39
40
41
42
43
44
45
46
47
public class MyTextureView extends TextureView implements TextureView.SurfaceTextureListener {
public MyTextureView(Context context) {
this(context,null);
}

public MyTextureView(Context context, AttributeSet attrs) {
this(context, attrs,0);
}

public MyTextureView(Context context, AttributeSet attrs, int defStyleAttr) {
this(context, attrs, defStyleAttr,0);
}

public MyTextureView(Context context, AttributeSet attrs, int defStyleAttr, int defStyleRes) {
super(context, attrs, defStyleAttr, defStyleRes);
init();
}

private void init() {
setSurfaceTextureListener(this);
}

@Override
public void onSurfaceTextureAvailable(SurfaceTexture surface, int width, int height) {
Canvas canvas = lockCanvas();
Log.e("Test",canvas.isHardwareAccelerated()+","+isHardwareAccelerated());
Paint paint = new Paint();
paint.setColor(Color.RED);
canvas.drawRect(new Rect(0,0,200,200), paint);
unlockCanvasAndPost(canvas);
}

@Override
public void onSurfaceTextureSizeChanged(SurfaceTexture surface, int width, int height) {

}

@Override
public boolean onSurfaceTextureDestroyed(SurfaceTexture surface) {
return false;
}

@Override
public void onSurfaceTextureUpdated(SurfaceTexture surface) {

}
}

setSurfaceTextureListener
代码里 canvas.isHardwareAccelerated()isHardwareAccelerated() 的结果分别是 false 和 true,具体的解释参考 Android 图形系统 – 硬件加速渲染
实验的结果是 TextureView 是可以进行旋转等动画的。

使用硬件加速绘制图形

前面介绍到,通过 lockCanvas() 得到的 Canvas 只能用软件绘制的。也就是说我们只能在软件中绘制 TextureView 的 Canvas,而 TextureView 本身将使用 GPU 绘制。

TextureView 播放视频

TextureView 作为普通 View 在 View hierarchy 中管理与绘制,更适用于小窗播放视频功能。但 TextureView 需要硬件加速层,使得 TextureView 比 SurfaceView 和 GLSurfaceView 更耗性能。
TextureView 视频播放器的源码请参考我的github的Demo:FloatWindowPlayer 中的 TextureView 部分。
Demo 中做到了页面内视频播放到悬浮窗播放的无缝切换,中间无需重新加载视频。
针对这种需求,一般的开发者采用的是页面内播放和悬浮窗播放使用一个相同的 TextureView 的方法,但是上面的代码中采取了另外一种思路。
采用的方法就是使用了一个全局的 MediaPlayer,页面内和悬浮窗播放是创建两个不同的 TextureView,重新设置了 TextureView 的 SurfaceTexture,而这两个 SurfaceTexture 使用的是相同的 texture id 来创建,相当于把原来页面中的 GLConsumer 附加到悬浮窗中新的 SurfaceTexture 的上下文中,这样,同一个 Mediaplayer 解码出的数据流就可以在两个不同的 TextureView 之间无缝的切换。

TextureView + OpenglES

一般 TextureView 与 OpenGL 和结合就是相机预览和视频播放了,那如果是一般的gles展示呢? 其实也是可以做到的,只是需要重新创建一个GL线程。只是这种方式比 GLSurfaceView 效率更低,因为GLSurfaceView本就对渲染同步、状态控制等做了优化封装,而且使用更简单,直接在设置的Renderer实现类中实现gl展示即可,这个后面会介绍。
下面也通过一个demo来展示实现 gles 绘图的用法。

实现一个渲染线程类:

1
2
3
4
5
6
7
8
9
10
11
12
13
14
15
16
17
18
19
20
21
22
23
24
25
26
27
28
29
30
31
32
33
34
35
36
37
38
39
40
41
42
43
44
45
46
47
48
49
50
51
52
53
54
55
56
57
58
59
60
61
62
63
64
65
66
67
68
69
70
71
72
73
74
75
76
77
78
79
80
81
82
83
84
85
86
87
88
89
90
91
92
93
94
95
96
public class RenderThread extends Thread{

private SurfaceTexture mSurface;

private EGL10 mEgl;
private EGLDisplay mEglDisplay;
private EGLConfig mEglConfig;
private EGLContext mEglContext;
private EGLSurface mEglSurface;

public RenderThread(SurfaceTexture surfaceTexture) {
mSurface = surfaceTexture;
}

@Override
public void run() {
initGL();

//开始画一帧数据

drawFrame();

// 一帧完成之后,调用eglSwapBuffers(EGLDisplay dpy, EGLContext ctx)来显示
// 这一句不能少啊,少了就什么都没有
mEgl.eglSwapBuffers(mEglDisplay, mEglSurface);

}

private void initGL(){
/*Get EGL handle*/
mEgl = (EGL10) EGLContext.getEGL();

/*Get EGL display*/
mEglDisplay = mEgl.eglGetDisplay(EGL10.EGL_DEFAULT_DISPLAY);

if (EGL10.EGL_NO_DISPLAY == mEglDisplay){
throw new RuntimeException("eglGetDisplay failed:"+ GLUtils.getEGLErrorString(mEgl.eglGetError()));
}

/*Initialize & Version*/
int versions[] = new int[2];
if (!mEgl.eglInitialize(mEglDisplay, versions)){
throw new RuntimeException("eglInitialize failed:"+GLUtils.getEGLErrorString(mEgl.eglGetError()));
}

/*Configuration*/
int configsCount[] = new int[1];
EGLConfig configs[] = new EGLConfig[1];
int configSpec[] = new int[]{
EGL10.EGL_RENDERABLE_TYPE, EGL_OPENGL_ES2_BIT,
EGL10.EGL_RED_SIZE, 8,
EGL10.EGL_GREEN_SIZE, 8,
EGL10.EGL_BLUE_SIZE, 8,
EGL10.EGL_ALPHA_SIZE, 8,
EGL10.EGL_DEPTH_SIZE, 0,
EGL10.EGL_STENCIL_SIZE, 0,
EGL10.EGL_NONE
};

mEgl.eglChooseConfig(mEglDisplay, configSpec, configs, 1, configsCount);
if (configsCount[0] <= 0){
throw new RuntimeException("eglChooseConfig failed:"+GLUtils.getEGLErrorString(mEgl.eglGetError()));
}
mEglConfig = configs[0];

/*Create Context*/
int contextSpec[] = new int[]{
EGL_CONTEXT_CLIENT_VERSION, 2,
EGL10.EGL_NONE
};
mEglContext = mEgl.eglCreateContext(mEglDisplay, mEglConfig, EGL10.EGL_NO_CONTEXT, contextSpec);

if (EGL10.EGL_NO_CONTEXT == mEglContext){
throw new RuntimeException("eglCreateContext failed: "+GLUtils.getEGLErrorString(mEgl.eglGetError()));
}

/*Create window surface*/
mEglSurface = mEgl.eglCreateWindowSurface(mEglDisplay, mEglConfig, mSurface, null);

if (null == mEglSurface || EGL10.EGL_NO_SURFACE == mEglSurface){
throw new RuntimeException("eglCreateWindowSurface failed"+GLUtils.getEGLErrorString(mEgl.eglGetError()));
}

/*Make current*/
if (!mEgl.eglMakeCurrent(mEglDisplay, mEglSurface, mEglSurface, mEglContext)){
throw new RuntimeException("eglMakeCurrent failed:"+GLUtils.getEGLErrorString(mEgl.eglGetError()));
}
}

private void drawFrame() {
//将背景设置为灰色
GLES20.glClearColor(0f,0f,1f,1.0f);
GLES20.glClear(GLES20.GL_COLOR_BUFFER_BIT);
}

}

然后在 onSurfaceTextureAvailable 回调中开启线程:

1
2
3
4
@Override
public void onSurfaceTextureAvailable(SurfaceTexture surface, int width, int height) {
new RenderThread(surface).start();
}

推荐文章

小窗播放视频的原理和实现(上):https://cloud.tencent.com/developer/article/1034235
小窗播放视频的原理和实现(下):https://cloud.tencent.com/developer/article/1047885
https://www.javaroad.cn/questions/12815